
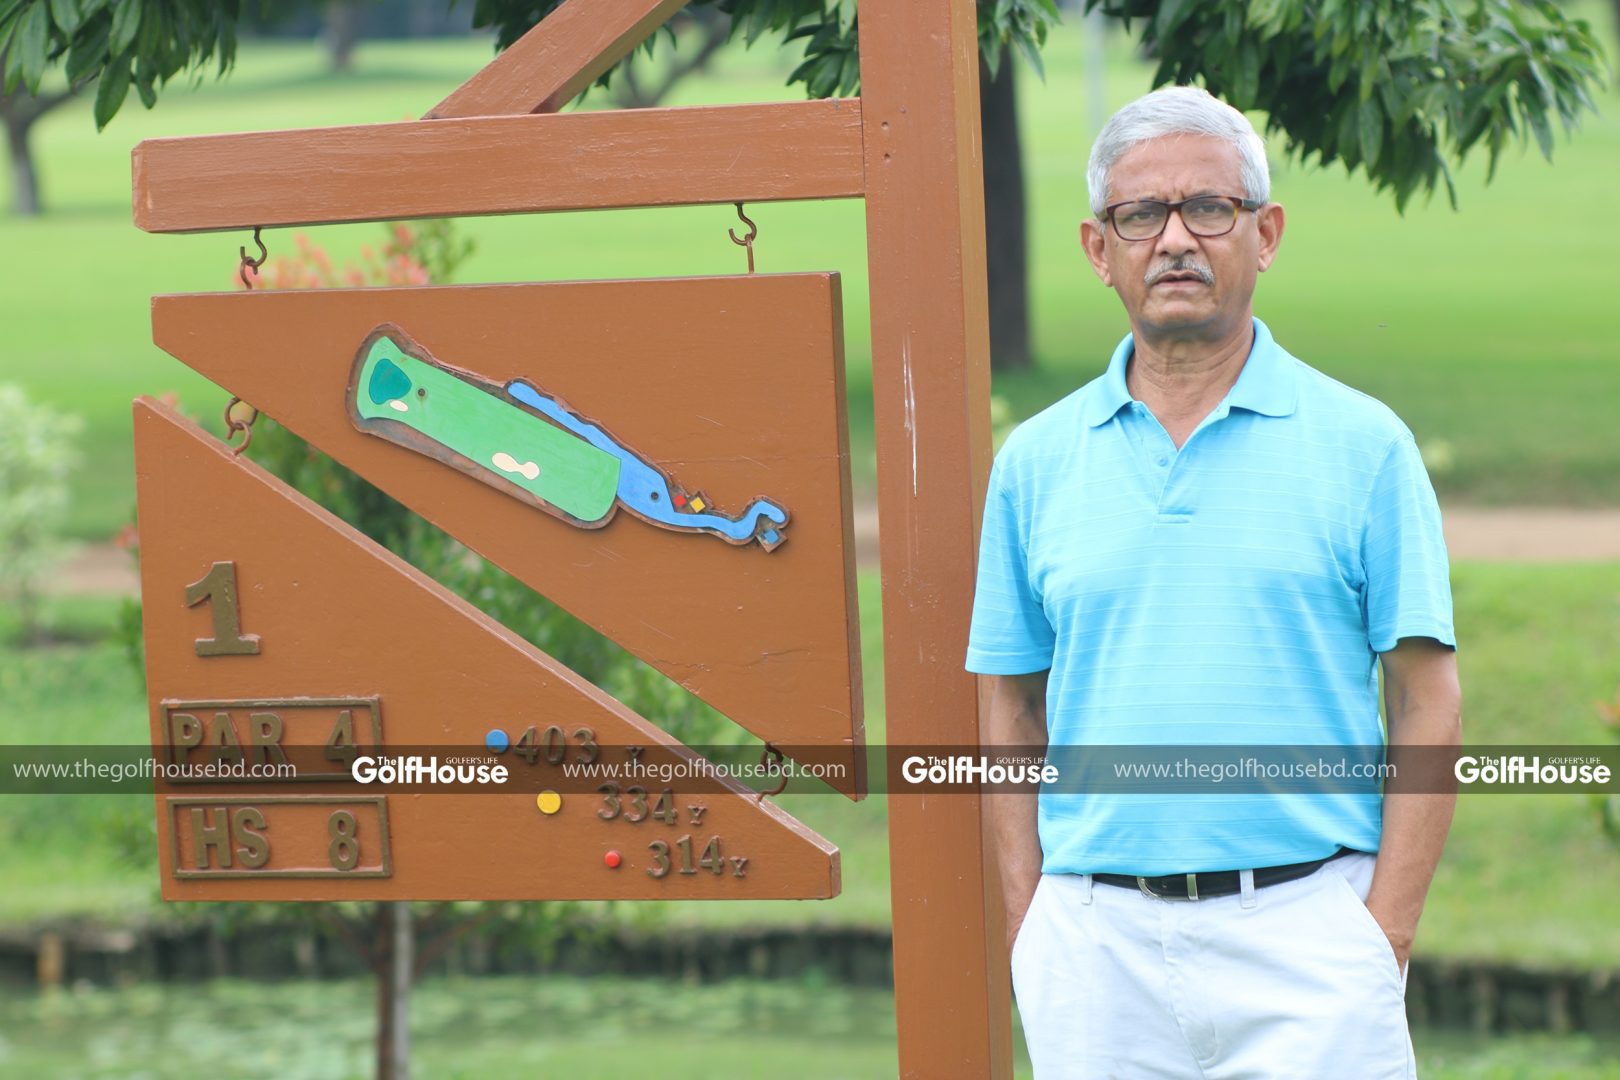
by Brig Gen Selim Akhtar (Retd)
KGC is not a very long course in terms of yardage and it is not a very difficult course to play but there are challenges and difficulties embedded in the course design and it might help if the golfer is aware of these design challenges. USGA Course ratings for KGC are as follows:
KURMITOLA GOLF CLUB
USGA RATINGS
| Tee | Date Rating | Front 9 | Back 9 | 18 Hole | Yards | |||
| Course Rating | Slope Rating | Course Rating | Slope Rating | Course Rating | Slope Rating | |||
| Black | 3/7/2017 | 35.2 | 129 | 36.1 | 135 | 71.3 | 132 | 6579 |
| Blue | 3/7/2017 | 34.5 | 127 | 35.4 | 132 | 69.9 | 130 | 6291 |
| Yellow | 3/7/2017 | 32.9 | 115 | 33.4 | 127 | 66.3 | 121 | 5494 |
| Red | 3/7/2017 | 34.2 | 125 | 34.9 | 132 | 69.1 | 129 | 5090 |
For regular golfers playing from BLUE Tee on a course with USGA course rating of 69.9 a scratch golfer is expected to score 2 under par on average, so it’s not a difficult course to play on. However, the BLUE slope rating of 130, which is much higher than a standard course difficulty of 113 indicates that the course design does present challenges and is certainly difficult from a golf course of standard difficulty. From my experience I would suggest the following considerations for any golfer which may help to card-in good scores.
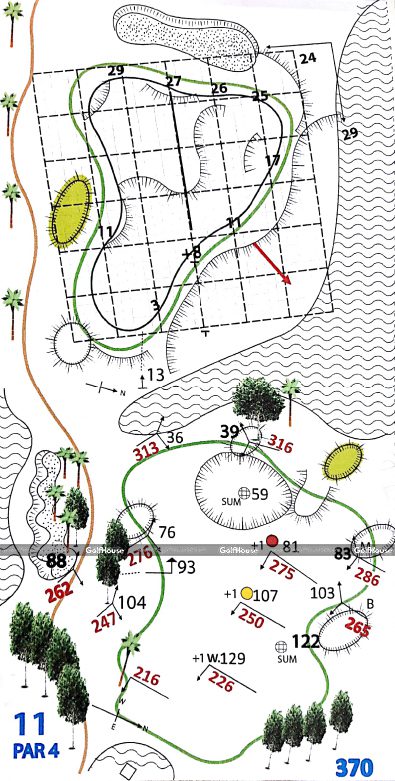
Hole # 1.
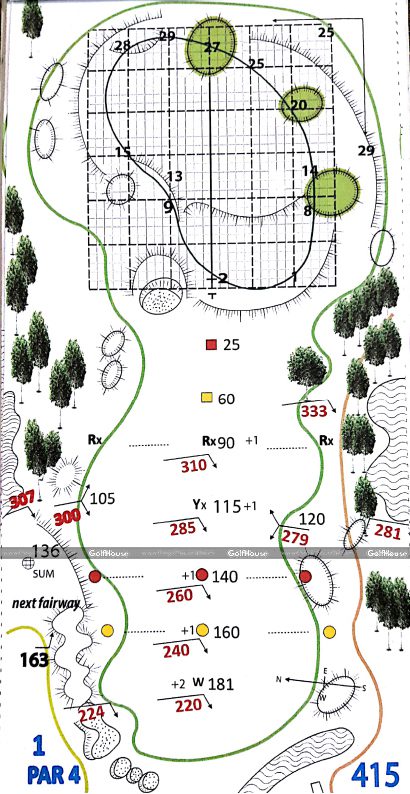
It’s a Par 4 hole and on tee off, one needs to carry approximately 100 yards over the water towards a wide open fairway. However, the Tee-box is aligned more towards the right side and golfers generally tend to stand square to the tee box. With that kind of alignment setup even a moderate fade can result in the ball going into the long water hazard on the right. It is preferable to align with the left edge of the fairway and with a gentle fade the ball will land in the center or a little on the right side of the fairway. Keeping the ball in the center or little on the right provides a better approach shot line and takes the green side bunker out-of-play. Green mostly slopes down towards the fairway and putting down slope can be tricky therefore aim to keep below the pin which will allow a more aggressive putt.
Hole # 2

It’s a Par 4 hole and the landing area is fairly narrow with the woods and the OB on the left and water hazard all along on the right. Additionally, for golfer’s driving around 260yards+ water hazard in the front comes into play. Therefore, one has to layoff short of the water hazard but keeping more to the right of the mango tree or else the tree and the distance to cover thereafter makes the second shot difficult. Approach shot to the green is fairly straight forward however one has to be aware of the water hazard and the OB on the left side. Green has multiple slopes reference to the yardage book will certainly be helpful. Generally speaking aim to stay below the green center or else one would be doing a down slope putt.
Hole # 3

It’s a short Par 5 hole and easy for most golfers to score par and leaves the opportunity for better skilled golfers to get a birdie or an eagle. On tee off, one needs to carry approx. 130 yards over the water towards into the fairly narrow fairway with bunkers on either side. More troublesome is the deep wooded area on the left. The hole sharply doglegs towards left with wide open approach to the green. Green has less depth so approach shot is likely to go over the green. Green has multiple slopes but generally speaking aim to stay in the middle and left of the green to avoid severe slope towards the right which causes the ball to roll off the green.
Hole # 4
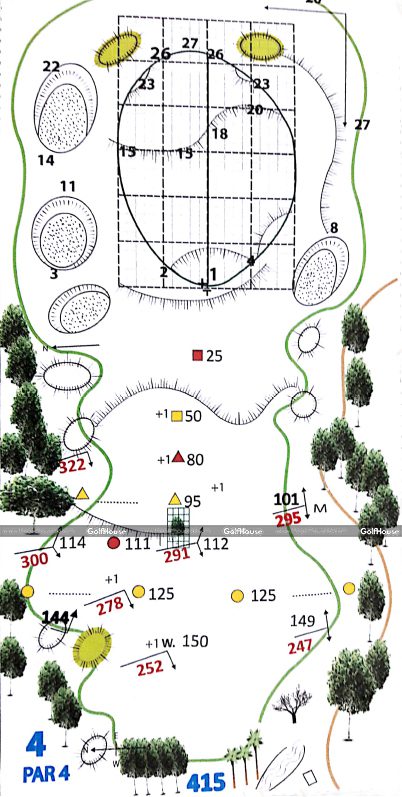
It’s a Par 4 hole but one of the toughest holes on the course because of a number of trees that come into play both during tee off and particularly for an approach shot to the green. One needs to tee off on a line away from the wooded area on the right. The adjoining Hole 3 fairway on the right is OB leaving little margin for ball to fade. Tee-box is aligned more towards the right side towards the wooded area. If the golfer stands square to the tee box rectangle, he is likely to end up among the trees on the right. Much better to align with the left edge of the fairway and with a gentle fade the ball will land in the center of the fairway. For the approach shot the tree right in the middle of the fairway makes it difficult to go for the green unless the ball is clear left or right of this tree. There are two green side bunkers which come into play on approach shot. Green mostly slopes down towards the fairway and putting downslope can be tricky therefore aim to keep to the center of the green.
Hole # 5

It’s a short Par 4 hole which doglegs to the left but the green is not visible from tee. It does provide an opportunity for long hitters to go for the green with the risk of going over the trees. The risk is if the ball does not carry to the green and lands on the adjoining Hole 4 fairway it will be OB. However, the hole rewards golfers who make it to green with increased chances for eagle or birdie. The hole sharply doglegs towards left with wide open approach to the green. There are two green side bunkers which come into play on approach shot. Comparatively it’s an easy hole to play.
Hole # 6
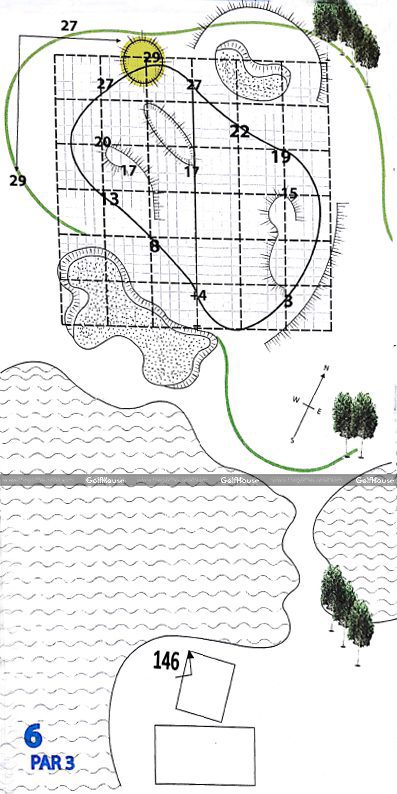
It’s a short Par 3 hole. Difficulties of the hole are tee-off across water hazard which requires carry distance of approx. 150 yards, a birdcage on the left which is OB and deep green side bunkers with near vertical face towards the green. Keeping to the right side of the green would be safe play for middle to high handicap players. Green has multiple slopes which can make long putts difficult unless the line is read properly. It’s an easy hole to play once you escape the stated dangers. This hole has seen most Hole-in-One at KGC.
Hole # 7
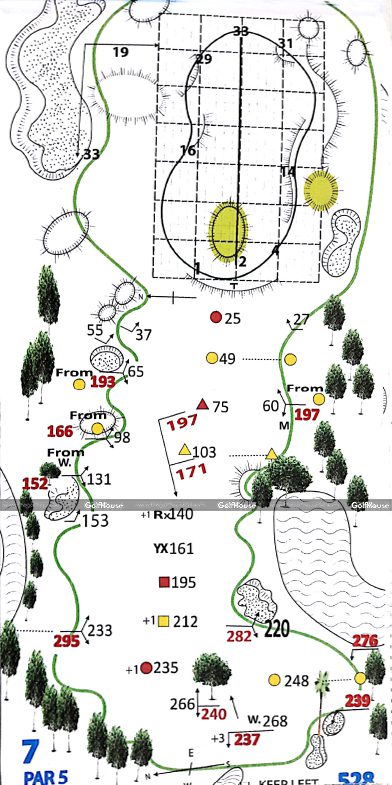
It’s a short Par 5 hole and easy for most golfers to score par and leaves the opportunity for better skilled golfers to get a birdie or an eagle. On tee off, one needs to carry approx. 130 yards over the water to the fairly wide fairway with long bunker running along on the right side. A large tree located at about 220 yards in the middle of the fairway rarely comes into play. However, for golfers who drive 270+ yards are likely to go into the water hazard in the front unless they can draw to keep the ball more to the left on the fairway. 2nd shot thereafter is a straight forward shot into a wide landing area leaving around 110 – 130 yards to the green which is protected by a bunker on the right. Forward part of the green has multiple slopes while rear part has comparatively less breaks. Generally speaking, aim to stay in the middle and to the right of the green.
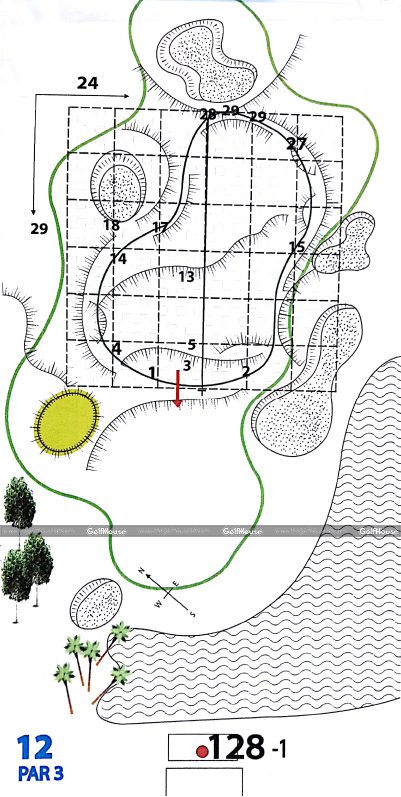
Hole # 08
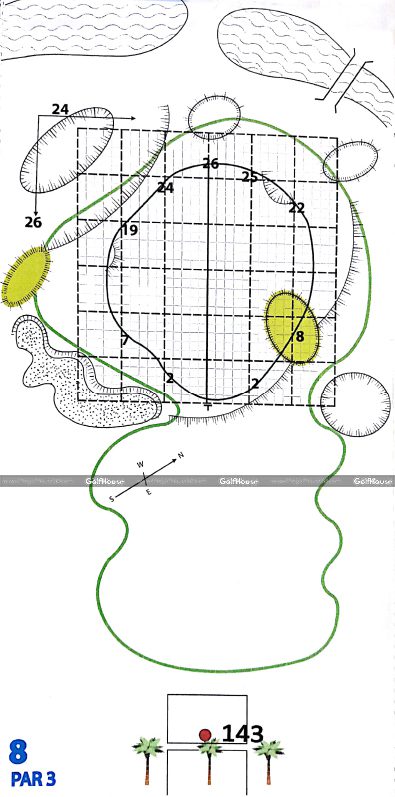
It’s a short Par 3 hole frequently played downwind. Depending on the tee position generally requires about 150 – 160 yards carry. Green is generally flat except for a mound like surface on the right side of the right edge which causes a severe break. If the pin is across this mound it would be advisable to aim for the center of the green with a gentle fade to let the ball run towards the pin. Attacking the pin from the tee across this mound like surface will certainly result in the ball running off the green. It’s an easy par able hole to play and often with good read of the green birdie is the reward.
Hole # 09
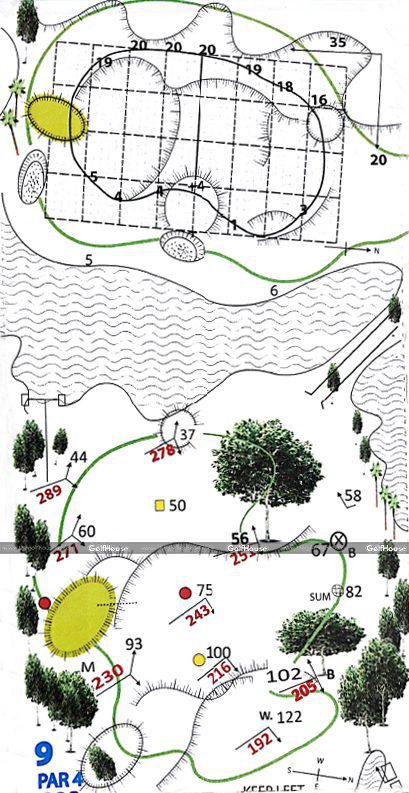
It’s a Par 4 hole and fairly challenging hole specially for high handicap players. The landing area is fairly narrow with slope running across the fairway width near the 100 yard marker. If the ball comes to rest on this down-slope than the 2nd shot to the green becomes a difficult shot. Apart from the water hazard to cross in front green additional difficulties of this hole are the two trees on the right part of the fairway. A good shot would be keeping well to the left of these two trees so that you have an unobstructed line to the green. A ball fading to the right will either go into the water hazard on the right OR will certainly be obstructed by the two trees. If the ball does come to rest behind the trees for the high handicap golfers the safe route would be to save and lay-off to the left and the go for the green with 3rd shot, well the allowable handicap strokes allow you to take that extra stroke. However, for low handicap golfers one can still go for the green keeping the ball low to fly under the tree. If you have one tree to cross it’s a playable shot with sand wedge going high over the tree to a distance of 80 yards.
……………………………………………………………………………………………………………….
Also read: KGC A SWEET VENTURE OF GOLF LOVERS
……………………………………………………………………………………………………………….
Hole # 10
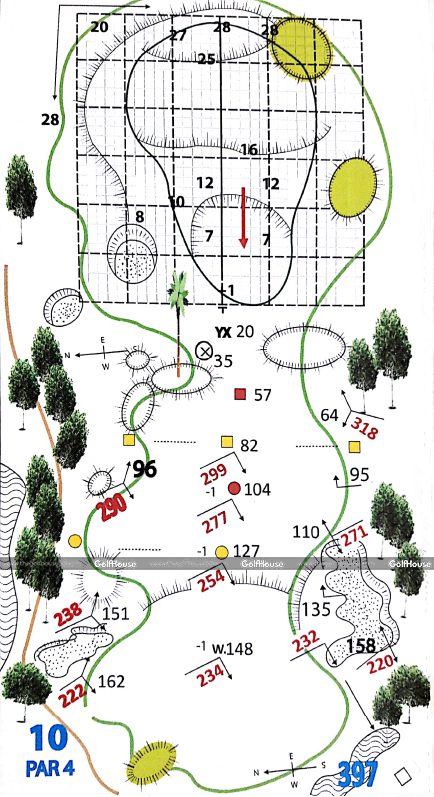
It’s a Par 4 and fairly challenging hole specially for high handicap players. On tee-off one needs to carry approx. 100 yards over the water hazard with OB on the right and another water hazard at a distance on the left. Additional challenges are bunkers and the tree line on both sides of the landing area. That makes the landing area is fairly narrow but flat and easy for the 2nd shot to the green. Long hitters may find themselves in better position if they fade the tee-off ball from the left tree line towards the fairway center. This hole has two layered green the front portion being significantly lower than the rear part of the green.
The rear part of the green gradually slopes away towards water hazard located immediately behind the green. So with pin position on the rear part of the green if pin position is attacked the chances are the ball will catch the slope and roll into the water hazard. It is much safer to hit the front part of the green and let the ball run up the slope towards the pin. On the other hand if the pin position is on the front or lower part of the green, it is much better to stay short and follow it up with chip-in attempt or an aggressive putt. Going past the pin will make ask for downslope put which can be a difficult hole. Further for the 2nd shot to the green one has to be careful about the OB along the driving range net on the right.
Hole # 11
It’s a Par 4 played across two water hazards. On tee-off one needs to carry approx. 150 yards over the water hazard with a generous and wide landing area straight ahead. The 2nd shot to the green requires the player to watch for the wind direction and get the correct distance to the pin. Green generally slopes down towards the water hazard and on this hole down slope putting can be treacherous and punishing. Green is further protected by a bunker past the green. Once in the bunker the shot requires good skills at bunker shot distance control or one is likely to end up in water hazard. Advice stay short and below the green to allow upslope chip or putt.
Hole # 12
It’s a short Par 3 played across water hazards which requires a carry distance of approx. 150 yards. Presence of large water surface in front and on the right does present wind conditions often so one needs to watch whether it’s a head-wind or tail-wind. Shot to green does not provide much error margin with right side being protected by deep bunkers and the left with trees and rough added further is another bunker on the left and forward.
Once in the bunker the shot requires good skills at bunker shot distance control or one is likely to end up in the bunker across the green. Forward part of the green slopes down which does at times cause the ball to roll backwards off the green. Overall it’s an easy par able hole if one can keep out of the stated difficulties.
Hole # 13
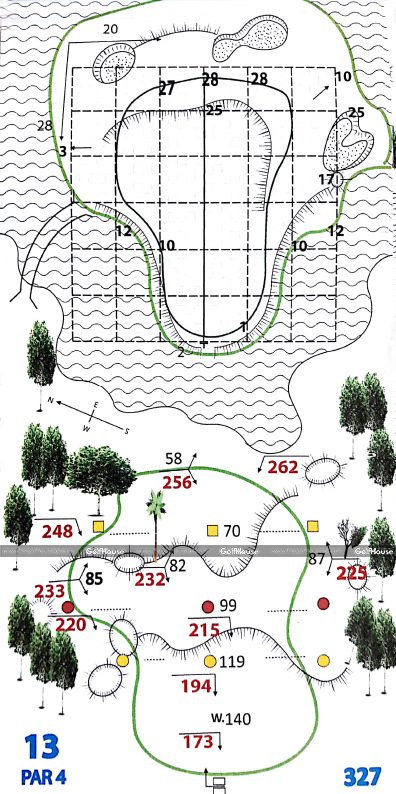
This is the signature hole of the course and is built as an island hole. In fact, the island was artificially created to meet the architect’s design requirement. It’s a Par 4 played over a narrow fairway and across water hazard all around the green. Being an island green it does not offer any margins for error. Further the palm tree on the fairway standing almost in the middle of the landing zone makes it difficult to go for the green if ball lands in line with that tree. Past the palm tree a slope runs across the narrow width of the LZ and if the ball stops on this down slope 2nd shot to the green can be very difficult specially for higher handicap players. So a golfer would be comfortable if the ball stays short of the palm tree and right of it or go well past the palm tree across the down slope to the flat part of the fairway ahead. Besides the difficulty of the green being on the island a green side bunker on the right side has folds where it can be difficult to take the back swing and further if you cannot control the distance for the bunker shot ball will certainly end in the water hazard across. However, the good news is, the grass bunker and the sand bunker across the green on the far side does provide some relief for shots going over. Green in general is flat with moderate slopes and is not difficult to play.
Hole # 14
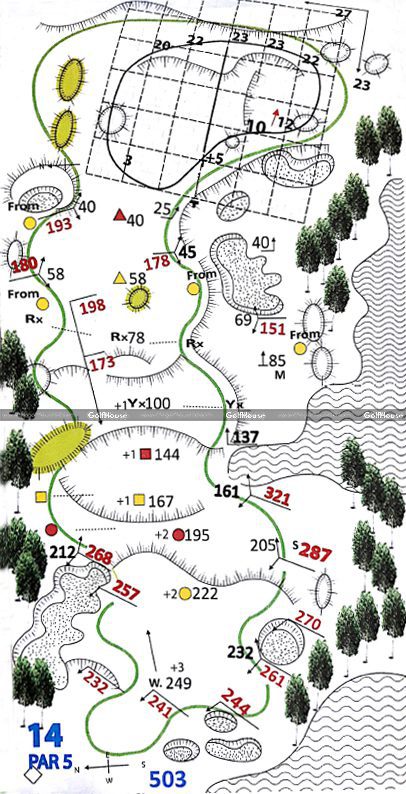
It’s a Par 5 hole and easy for most golfers to score par and yet the hole offers lot of opportunity for better skilled golfers to get a birdie. Tee off can be challenging with wooded area and the OB on the left with the water hazard to carry. Landing area is narrow protected by bunker on two sides supplemented with trees and rough on the right. So just a long drive is not very helpful unless one can draw to land short of the water hazard in the front. For the 2nd shot one has to guard against long bunker straight ahead right up to the green. Also for the 2nd shot fairway sloping towards the bunker comes in play and often to frustration of golfer’s, ball does slide down into the bunker unless one keeps well to the left. Approach or 3rd shot to the green is not very difficult though there are a number of green side bunkers. Green in general has moderate slopes and is not very difficult to play. In summary it’s an easily parable hole.
Hole # 15
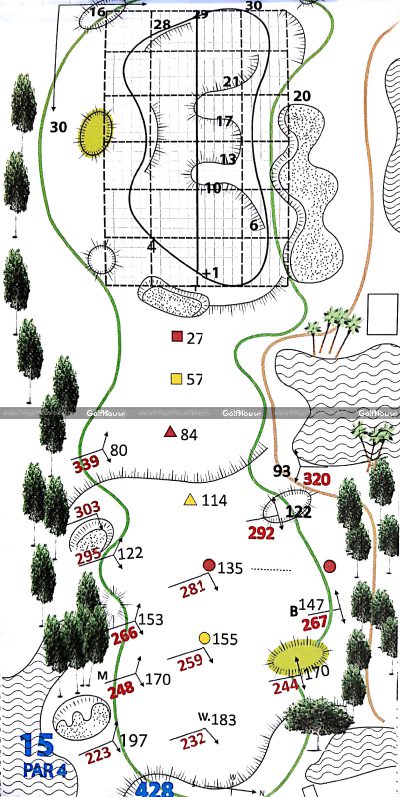
It’s is a difficult Par 4 because it presents very narrow landing area for the tee-off shot. LZ id guarded on both sides by thickly wooded area and rough which will take away one shot to come back to fairway. Ambitious shots from inside the wooded area can land you back into more trouble. Long hitter needs to watch the water hazard in front which may come into play for shots close to 280 – 300 yards depending on tee position. The 2nd shot is fairly simple but one has to watch the green side bunker on the right. Green generally flat with moderate breaks.
Hole # 16
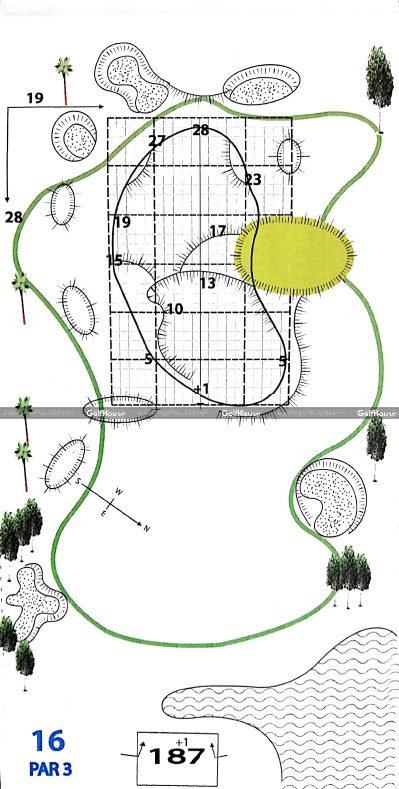
It’s a long Par 3 without any hazards on way to green and requires a carry distance of approx. 200 yards. Green has protection of a bunker a little short on the right and another two bunkers across the green to catch ball going over the green.
This hole has kind of ridge line or a hump line across in the center and that present a situation of upslope and down slope putts. So if pin position on the rear part of the green it is much safer to hit the front part of the green for the ball to run up the slope towards the pin. If the pin position is on the front part of the green, it is much better to stay short and follow it up with chip-in attempt or an aggressive putt. Going past the pin will ask for downslope put which can be difficult to hole.
Hole # 17
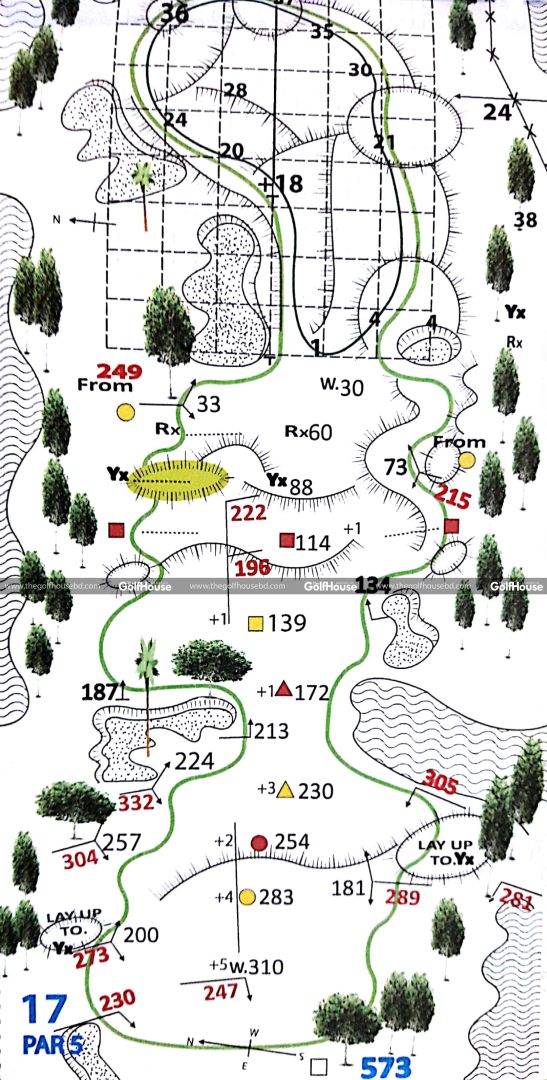
It’s a long Par 5 hole and indeed the most difficult hole on the course. Tee off can be challenging with wooded area and the water hazard on the right. A good landing area with maximum width is at a distance of approx. 250 yards. Thereafter the fairway starts narrowing down. Driving for a distance longer distance like 300 yards runs the risk of running into either the fairway bunker or the water hazard on the right. Anyway the reward for such a risky long drive shot is not very encouraging because getting onto the green in two shots can still be difficult. For the 2nd shot one has to keep to the right side of the fairway to keep the greenside bunkers out of play for 3rd shot. Going for 3rd shot with a wedge provides good chance to get close to pin and a birdie. Hole 17th green is extremely tricky with slope on the right side running towards the bunker on the left. Green has an area of small depression on the front left part with lots of break and the putting can be difficult. Additionally, there is OB on the right (deer cage) and the boundary OB beyond the green coupled with deep rough all around the green.
Hole # 18
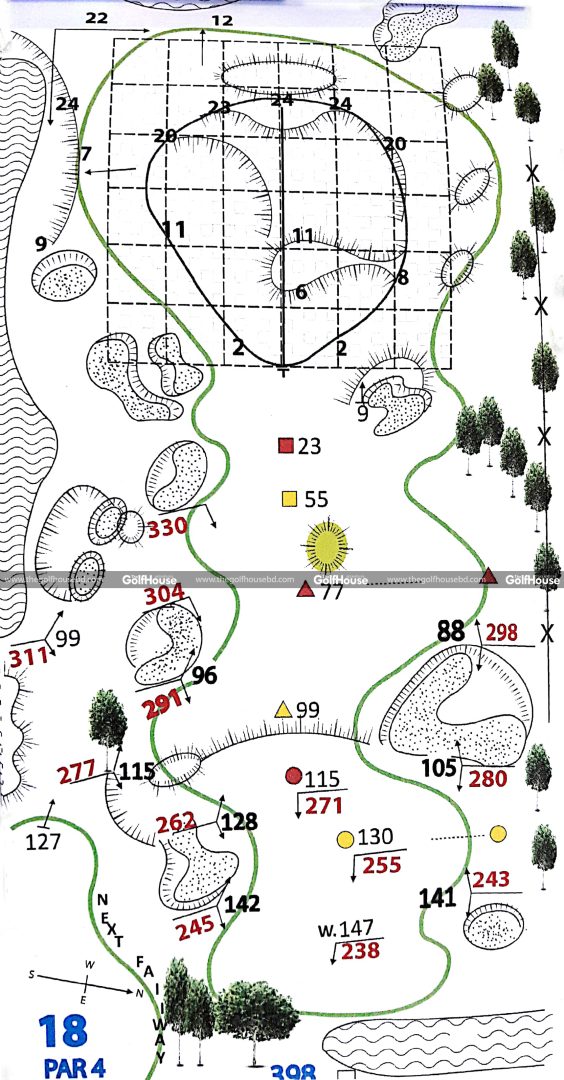
It’s is the easiest Par 4 hole on the course, however one needs to be careful not to fade the ball as practice range fence OB runs all along on the right side. The 2nd shot is fairly simple and straight forward but one has to watch the water hazard on the left. Green has moderate breaks and is not very challenging.